Tuesday, September 20, 2011

Kitchen Update!

I've made major progress in the kitchen!  Today I'm going to show you what I've been busy working on for about a month now!

Here is my kitchen before.


Blah.

And here it is now!  I painted the walls and the cabinet/drawer pulls and we installed new lights!


The wall color is Valspar's Smoke Infusion.  I love it.  The lights are made with recycled glass and were marked down to {drum roll please} $4.  Each.  Yup, you read that right!  Originally they were almost $80!  But don't ask my husband how instillation went...  We figured out quickly why they were a returned item...

The knobs and pulls got a spray paint face lift.  Why?  Well, you can see for yourself.

Before:

Different colors.  Lovely right?  And the previous paint job was wearing off.


I don't want to shell out big bucks to replace 50 knobs and pulls so I bought two cans of spray paint instead.  


I starting by priming.  We skipped this step last time.  Trust me, its worth the extra $5 and hour of time.  I poked toothpicks through a cardboard box to keep my knobs upright.  I'm lazy.  I left all the screws in the cabinet doors.


Then I sprayed two coats of Valspar's Metallic Oil Rubbed Bronze.  I painted the entire thing this time.  It was time to say goodbye to the off-white, always dirty looking center.


Ahhhhh.  Much better.


Feels good to have another project scratched off the list!


Sunday, September 18, 2011

Dress Up Closet Tutorial

Last month I posted pictures of our Princess Bedroom Project.  Today I thought I would finally share how I organized the closet!  The girls needed a place to keep all of their dress-up clothes and jewelry.  The project began outside of Hobby Lobby when I spotted this cupcake frame in a clearance bin for $5!  It was marked down from $40 and the cupcake mat was falling off.  Instantly I had flashbacks to a very successful project and knew what to do. 

Supplies for Jewelry Frame:
Cute Clearance Frame
2 Pieces of Scrapbook Paper
White Poster Board
 Package of Mini Pegs
Recycled Cardboard Boxes
Spray Adhesive
White Spray Paint
Wood Glue
Mod Podge


First, I removed the hardware from the back of the frame and peeled the backing off.  Then, I cut a cardboard box into two squares (for double strength) that would fit into the frame.  It was nap time so another trip to the store was out of the question.  Luckily we had pizza the night before!  The boxes worked perfectly.  I also cut a square of poster board to layer between the cardboard and scrapbook paper so the paper would keep its color.  I used spray adhesive to bond all of these layers together.


Next, I measured out the placement of the mini pegs.  I found these pegs at Hobby Lobby in the unfinished wood isle.  Using a drill press, I carefully drilled holes for the pegs.  I wasn't sure how clean the drill would cut paper/cardboard so I attached the scrapbook paper after drilling.  I used spray adhesive again, but this time I clipped the edge in place before spraying.  This is the easiest way I've found to get the paper on straight the first time!  I went back and slit the holes with an X-acto knife.
  

The frame is ready to assemble!  I popped in my pretty paper/cardboard.  The back of the frame was gooey from the previous backing so I plopped the frame on my leftover poster board, traced the edges, and cut a new backing.  I also screwed the hardware back on in the original holes (be sure to take note of where your holes are before covering them with poster board!)

I applied a few coats of Mod Podge to the pretty paper to give it a nice shine. The pegs got a quick spray of white paint.  Above you see them stuck in the bottom of a styrofoam bowl.  When they were dry I used wood glue to secure them in the holes!

Jewelry Peg Board Tutorial

My dress-up jewelry frame is finished!  My girls think they are so grown up.

Now off to tackle the dress up clothes that tend to be scattered all over the floor...

Peg Board Supplies:
1x4 cut to desired length
Wood Glue
Wood Pegs
Primer
Paint


This was SUPER simple!  I bought the straightest 1x4 I could find at Lowes.  I cut it to the width of the closet wall and marked the peg placement.  This time I'm using Shaker Pegs that are about twice as big as the mini pegs from the jewelry frame.  I had a few mini pegs leftover so I threw them in too.  You can never have too many pegs.  I sanded the board, drilled holes for the pegs, and glued them in place.  One coat of primer and two coats of pink paint.  Screw your peg board securely into studs.

Princess Dress Up Closet

That's it!  The girls played in their new dress-up closet for a while and I sat on the couch drinking a large glass of ice water.  Did I mention the cutting, drilling, and sanding took place outside in the Oklahoma summer heat?  What was I thinking???


How do you keep your kids' stuff organized?  


Tip Junkie handmade projects

Sunday, August 21, 2011

iPad 2 Cover with Hand Strap Tutorial

A few days ago my husband surprised me with an iPad 2.  I was completely stressed out over the first week of school and I didn't see it coming.  Yup, he's awesome like that.  

At first I couldn't put it down.  Then I was scared of dropping it.  So I decided to make a padded cover with a hand strap.  Here you can see the finished product.

iPad 2 Cover

I started with fabric scraps and HeatnBond leftover from another project.  A quick trip to Hobby Lobby added ribbon, elastic, and batting.


I used two pieces of 8.5 x 11 paper as a pattern.  If I ever make another cover like this I'll enlarge the pattern a smidge for larger seam allowances.  My seam allowances were about 1/2 inch, which didn't give me much wiggle room.  I'd also add about half an inch of width without cardboard for the fold.  {Did I mention I'm not a professional seamstress?  I've learned a lot from trial and error.  Mostly error.}  


Cut two pieces of fabric for the inside of the cover. 


The bubble fleece worked a lot better in my head than in reality.  
Its just so. stinkin. stretchy.


I used HeatnBond to attach batting to the back of each piece.  I was very careful when ironing the bubble fleece as to not iron out all the bubbles.


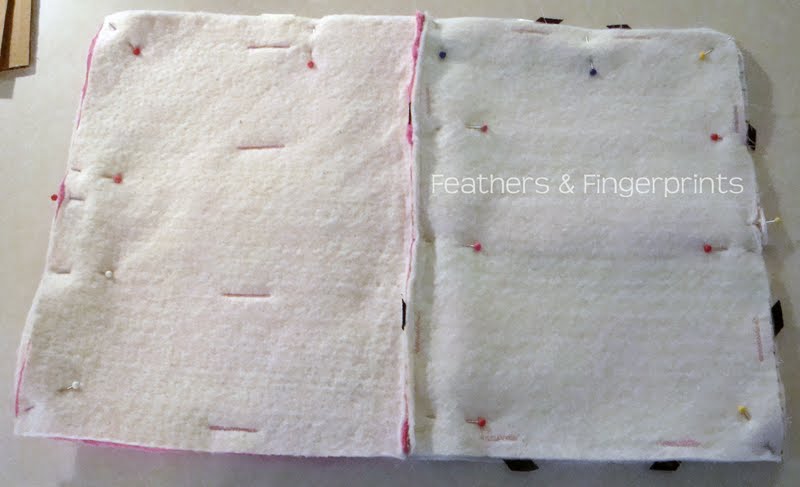
I added a ribbon to the left piece for a hand strap.  I attached it using a tight zigzag in four spots (top, bottom, 3.5 inches from top, and 3.5 inches from bottom).  On the right piece I laid out the black elastic to hold the corners of my iPad and pinned.  After removing the iPad I tightened the elastic slightly before securing with another short zigzag.  Next I sewed my right and left piece together.


I pinned my ribbon ties to the edges so I wouldn't forget later.


Now for the outside of my case.  I wanted to use two fabrics so I folded my pattern almost in half horizontally (adding a seam allowance).  A modified "hot dog fold" if you will.  


 I pressed the seam open and added a ruffle ribbon to the right side.


Bonded batting to the back.


Cut two rectangles from a diaper box. They were roughly 7.5 x 9.5 inches.


Sew inside piece (fleece & stripes) to outside piece, right sides together.  Leave top open to insert cardboard.


Turn right side out and press.  Fold top seam in and press.


Sew a straight line down the crease to keep the cardboard in place.  Insert cardboard.


Carefully stitch the top closed.


Ta-da!


Tip Junkie handmade projects

Sunday, August 14, 2011

Cut Clutter in the Classroom!

Today Feathers & Fingerprints is going back to school!  


Let's think for a minute about all those back to school supplies you just bought for your kids.  Pencils, fat markers, skinny markers, dry erase markers, erasers, crayons, glue bottles, glue sticks, baggies, scissors, folders, notebooks, and tissue. Did I miss anything?

Now imagine you are a teacher.
In a public school classroom with limited space.
And multiply that list times 22.

Are you overwhelmed?  Me too.  That's why my classroom uses "community supplies."  Meaning, all of our supplies are stored together and shared.  A few bottles of glue on the shelf and 15 in the closet.  I've found this cuts back on the clutter around the room.  And there is less waste.  And I ask parents for less supplies.  It is much easier to make sure 5 bottles of glue are closed tight rather than 22!

So how do I get my 6 year olds to share markers?  Easy!  Wood marker holders!  
{I stole this idea from an art teacher!  Its brilliant!} 


Wood Marker Holders

Three years ago I bought a 2x6 and cut it into 8 inch sections.  I used the drill press to drill 10, 1/2" holes in each.  My husband graciously routed the edges and I gave them a good sanding.  Last, I used 5-minute epoxy to glue the marker caps in the holes.


Each table in my classroom has a marker holder.  You can see from the pictures they have been used a lot!  About a week ago I brought them home to pull out the old {worn out and broken} marker caps and decided to add smaller holes for skinny markers.  This time I used a 3/8" bit and drilled 8 holes across.  I also gave them a face-lift by painting the edges different colors.


I'll take my improved marker holders back to school tomorrow to glue the new marker caps.  Trust me, they transport much easier without markers in them!


Reasons why I love these:
*no lost caps
*no markers on the floor
*no fights over "who stole my marker"
*dried up markers can be quickly replaced
*broken caps can be pulled out with pliers


Do you have a genius storage solution for your classroom?  Please share!